表示文字列の設定
広告
TextViewクラスのオブジェクトに表示される文字列を設定します。「TextView」クラスで用意されている「setText」メソッドを使います。
setText
public final void setText(CharSequence text)
Sets the text that this TextView is to display (see setText(CharSequence))

Related XML Attributes:
  android:text

Parameters:
  text  表示文字列
1番目の引数には表示する文字列を指定します。
また同じメソッド名で引数の異なるメソッドが多数用意されていますが、バッファータイプを指定するメソッドを見てみます。
setText
public void setText(CharSequence text, BufferType type)
Sets the text that this TextView is to display (see setText(CharSequence))
 and also sets whether it is stored in a styleable/spannable buffer and
 whether it is editable.

Related XML Attributes:
  android:text
  android:bufferType

Parameters:
  text  表示文字列
  type  バッファータイプ
1番目の引数には表示する文字列を、2番目の引数には文字列のBufferTypeを設定します。
BufferTypeには「android.widget.TextView.BufferType」クラスで用意されている3つの定数から1つ指定して下さい。
BufferType.EDITABLE
BufferType.NORMAL
BufferType.SPANNABLE
※ただ、全て指定して試してみましたが違いがよく分かりませんでした。分かり次第修正します。
具体的には次のように記述します。
import android.app.Activity;
import android.os.Bundle;
import android.widget.TextView;
import android.view.ViewGroup.LayoutParams;

public class Test extends Activity {
    @Override public void onCreate(Bundle icicle) {
        super.onCreate(icicle);

        TextView tv = new TextView(this);
        tv.setText("Hello");
        setContentView(tv);
    }
}
サンプルプログラム
それでは実際に試してみます。プロジェクトを作成しソースコードを次のように変更しました。
package jp.javadrive.android;

import android.app.Activity;
import android.os.Bundle;
import android.widget.TextView;
import android.view.ViewGroup.LayoutParams;

public class Test02_01 extends Activity
{
    /** Called with the activity is first created. */
    @Override
    public void onCreate(Bundle icicle)
    {
        super.onCreate(icicle);

        TextView tv = new TextView(this);
        tv.setText("Hello");
        setContentView(tv, new LayoutParams(LayoutParams.WRAP_CONTENT,
          LayoutParams.WRAP_CONTENT));
    }
}
ビルド後にエミュレーター上で実行します。
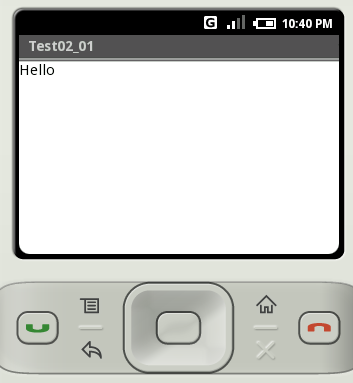
指定した文字列が表示されました。
( Written by Tatsuo Ikura )
Profile

著者 / TATSUO IKURA
プログラミングや開発環境構築の解説サイトを運営しています。