列である子ビューを行に追加
TableRowクラスのオブジェクトは行に相当するオブジェクトです。1つの行に含まれる列の数だけ今度はビューを追加していきます。行に含まれる列の数(追加されたビューの数)は全ての行で基本的には同じになりますが、複数の列にまたがるようにビューを配置することも可能です。
ではまずビューを追加していく方法を確認します。「TableRow」クラスで用意されている「addView」メソッドを使います。
addView
public void addView(View child)
Adds a view to this table row using the view's existing layout parameters.
If the view does not have layout parameters (i.e. getLayoutParams()
returns null), then a default instance of TableRow.LayoutParams is used
instead.

Parameters:
  child  the view to add to this row
1番目の引数には追加したい子のビューを指定します。
複数のビューを追加する場合は繰り返し「addView」メソッドを使って下さい。追加した順に左から右へ向かって追加されていきます。
なお「TableRow」クラスにビューを追加する場合にはレイアウトパラメーターを指定する必要はありません。列として追加されるビューには水平方向を「FILL_PARENT」、垂直方向を「WRAP_CONTENT」に設定することが推奨されています。設定を行わなかった場合はこの値が使用されるようです。(android.widget.TableRow.LayoutParamsクラスも用意されているので、親クラスの「ViewGroup」クラスで用意されている「addView」メソッドを使いあえて設定することは可能です)。
具体的には次のように記述します。
private final int WC = ViewGroup.LayoutParams.WRAP_CONTENT;
private final int FP = ViewGroup.LayoutParams.FILL_PARENT;

@Override public void onCreate(Bundle icicle) {
    super.onCreate(icicle);

    TableLayout tableLayout = new TableLayout(this);
    setContentView(tableLayout);

    TextView text1 = new TextView(this);
    TextView text2 = new TextView(this);

    TableRow tableRow = new TableRow(this);
    tableRow.addView(text1);
    tableRow.addView(text2);

    tableLayout.addView(tableRow, new TableLayout.LayoutParams(FP, WC));
}
サンプルプログラム
それでは実際に試してみます。プロジェクトを作成しソースコードを次のように変更しました。
package jp.javadrive.android;

import android.app.Activity;
import android.os.Bundle;
import android.widget.TextView;
import android.widget.EditText;
import android.widget.TableLayout;
import android.widget.TableRow;
import android.view.ViewGroup;

public class Test04_01 extends Activity {
    private final int WC = ViewGroup.LayoutParams.WRAP_CONTENT;
    private final int FP = ViewGroup.LayoutParams.FILL_PARENT;

    @Override public void onCreate(Bundle icicle) {
        super.onCreate(icicle);

        TableLayout tableLayout = new TableLayout(this);
        setContentView(tableLayout);


        TextView text1 = new TextView(this);
        text1.setText("user");

        EditText edit1 = new EditText(this);
        edit1.setWidth(100);

        TableRow tableRow1 = new TableRow(this);
        tableRow1.addView(text1);
        tableRow1.addView(edit1);


        TextView text2 = new TextView(this);
        text2.setText("pass");

        EditText edit2 = new EditText(this);

        TableRow tableRow2 = new TableRow(this);
        tableRow2.addView(text2);
        tableRow2.addView(edit2);


        TextView text3 = new TextView(this);
        text3.setText("mail address");

        EditText edit3 = new EditText(this);

        TableRow tableRow3 = new TableRow(this);
        tableRow3.addView(text3);
        tableRow3.addView(edit3);


        tableLayout.addView(tableRow1, createParam(FP, WC));
        tableLayout.addView(tableRow2, createParam(FP, WC));
        tableLayout.addView(tableRow3, createParam(FP, WC));
    }

    private TableLayout.LayoutParams createParam(int w, int h){
        return new TableLayout.LayoutParams(w, h);
    }
}
ビルド後にエミュレーター上で実行します。
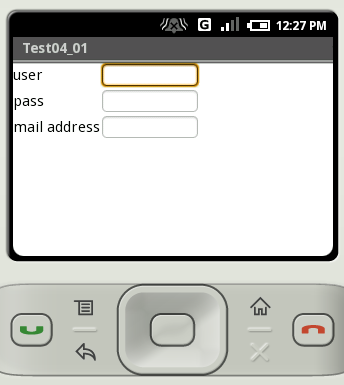
各行に配置された列は、全ての行で同じ幅となります。
( Written by Tatsuo Ikura )

著者 / TATSUO IKURA
プログラミングや開発環境構築の解説サイトを運営しています。