他のビューに対する相対位置の指定
追加されるビューに対しては「RelativeLayout.LayoutParams」クラスのオブジェクトを使って幅や高さなどのレイアウト情報を設定していました。
private final int WC = ViewGroup.LayoutParams.WRAP_CONTENT;

Button button = new Button(this);
RelativeLayout.LayoutParams rlp = new RelativeLayout.LayoutParams(WC, WC);
relativeLayout.addView(button, rlp);
このビュー自身のサイズに関する設定の他に、別に追加されたビューに対する位置関係を設定することができます。「RelativeLayout.LayoutParams」クラスで用意されている「addRule」メソッドを使います。
addRule
public void addRule(int verb, int anchor)
Adds a layout rule to be interpreted by the RelativeLayout. Use this for
verbs that take a target, such as a sibling (ALIGN_RIGHT) or a boolean
value (VISIBLE).

Parameters:
  verb  One of the verbs defined by RelativeLayout, such as
    ALIGN_WITH_PARENT_LEFT.
  anchor  The id of another view to use as an anchor, or a boolean
    value(represented as TRUE) for true or 0 for false). For verbs that
    don't refer to another sibling (for example, ALIGN_WITH_PARENT_BOTTOM)
    just use -1.
1番目の引数には対象となるビューに対する位置を表す値を設定します。設定できる値は「RelativeLayout」クラスで定義されており次のような値があります。
int  ALIGN_BASELINE
int  ALIGN_BOTTOM
int  ALIGN_LEFT
int  ALIGN_RIGHT
int  ALIGN_TOP
int  ALIGN_WITH_PARENT_BOTTOM
int  ALIGN_WITH_PARENT_LEFT
int  ALIGN_WITH_PARENT_RIGHT
int  ALIGN_WITH_PARENT_TOP
int  CENTER_HORIZONTAL
int  CENTER_IN_PARENT
int  CENTER_VERTICAL
int  POSITION_ABOVE
int  POSITION_BELOW
int  POSITION_TO_LEFT
int  POSITION_TO_RIGHT
int  TRUE
例えば対象のビューに下側に配置したい場合には「RelativeLayout.POSITION_BELOW」を指定します。
次に2番目の引数には対象となるビューを表すIDを設定します。例えばビューBの位置を指定するために、ビューAを基準として位置を指定(例えばビューAの下側)する場合には、そのビューAに割り当てられたIDを指定します。
レイアウトXMLでビューを設定している場合はまた別ですがプログラムの中で作成したビューに対してIDを割り当てるにはビューの親クラスである「View」クラスで用意されてる「setId」メソッドを使います。
setId
public void setId(int id)
Sets the identifier for this view. The identifier does not have to be
unique in this view's hierarchy. The identifier should be a positive
number.

Parameters:
  id  a number used to identify the view
引数にはビューを識別するための数値を指定して下さい。ビューに設定する数値は複数のビューに対して同じ値を割り当てないようにしなければなりません。
具体的には次のように記述します。
private final int WC = ViewGroup.LayoutParams.WRAP_CONTENT;

@Override public void onCreate(Bundle icicle) {
    super.onCreate(icicle);

    RelativeLayout relativeLayout = new RelativeLayout(this);
    setContentView(relativeLayout);

    Button button1 = new Button(this);
    button1.setId(1);
    button1.setText("Yahoo Japan");
    relativeLayout.addView(button1,
      new RelativeLayout.LayoutParams(140, 80));

    Button button2 = new Button(this);
    button2.setId(2);
    button2.setText("Microsoft Corp");
    RelativeLayout.LayoutParams param =
      new RelativeLayout.LayoutParams(WC, WC);
    param.addRule(RelativeLayout.POSITION_TO_RIGHT, 1);
    relativeLayout.addView(button2, param);
}
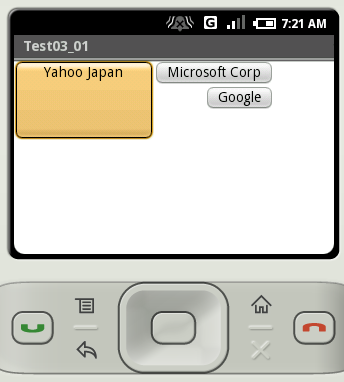
サンプルプログラム
それでは実際に試してみます。プロジェクトを作成しソースコードを次のように変更しました。
package jp.javadrive.android;

import android.app.Activity;
import android.os.Bundle;
import android.widget.Button;
import android.widget.RelativeLayout;
import android.view.ViewGroup;

public class Test03_01 extends Activity {
    private final int WC = ViewGroup.LayoutParams.WRAP_CONTENT;

    @Override public void onCreate(Bundle icicle) {
        super.onCreate(icicle);

        RelativeLayout relativeLayout = new RelativeLayout(this);
        setContentView(relativeLayout);

        Button button1 = new Button(this);
        button1.setId(1);
        button1.setText("Yahoo Japan");
        relativeLayout.addView(button1, createParam(140, 80));

        Button button2 = new Button(this);
        button2.setId(2);
        button2.setText("Microsoft Corp");
        RelativeLayout.LayoutParams param2 = createParam(WC, WC);
        param2.addRule(RelativeLayout.POSITION_TO_RIGHT, 1);
        relativeLayout.addView(button2, param2);

        Button button3 = new Button(this);
        button3.setText("Google");
        RelativeLayout.LayoutParams param3 = createParam(WC, WC);
        param3.addRule(RelativeLayout.POSITION_BELOW, 2);
        param3.addRule(RelativeLayout.ALIGN_RIGHT, 2);
        relativeLayout.addView(button3, param3);
    }

    private RelativeLayout.LayoutParams createParam(int w, int h){
        return new RelativeLayout.LayoutParams(w, h);
    }
}
ビルド後にエミュレーター上で実行します。
1つのレイアウトパラメーターに対して複数の「addRule」メソッドを実行することができます。
( Written by Tatsuo Ikura )

著者 / TATSUO IKURA
プログラミングや開発環境構築の解説サイトを運営しています。