任意のビューをアラートダイアログに表示
今までのサンプルではアラートダイアログには文字列を表示してきました。ここでは任意のビューをアラートダイアログに表示させる方法を確認します。「AlertDialog」クラスで用意されているstaticメソッドである「show」メソッドを使います。前のページで利用したメソッドと同じですが引数が異なります。
show
public static AlertDialog show(Context context,
                               CharSequence title,
                               View view,
                               CharSequence buttonText,
                               OnClickListener buttonListener,
                               CharSequence button2Text,
                               OnClickListener button2Listener,
                               boolean cancelable,
                               OnCancelListener cancelListener)
Display a simple alert dialog. This convenience method constructs an
AlertDialog and shows it.

Parameters:
  context  the context in which this alert is created.
  title  the title to be shown in the alert, pass null will not show
    a title
  view  the view to display in the alert.
  buttonText  the text to be shown in the button, pass null will make
    the alert buttonless.
  buttonListener  a DialogInterface.OnClickListener to be notified when
    the button is clicked
  button2Text  the text to be shown in the second button, passing null
    will hide the second button.
  button2Listener  a DialogInterface.OnClickListener to be notified
    when the second button is clicked
  cancelable  if true, clicking the BACK button will dismiss the alert.
  cancelListener  if cancelable, this DialogInterface.OnCancelListener's
    onClick method will be called when the BACK button is clicked.
1番目の引数には引数にはダイアログを作成する元になった「Context」クラスのオブジェクトを指定します。ここでは(「Activity」クラスを継承したクラスのオブジェクトの)自分自身を表す「this」を指定して下さい。
2番目の引数にはダイアログのタイトルに表示される文字列を指定して下さい。
3番目の引数にはダイアログに表示されるViewクラスのオブジェクトを指定して下さい。
4番目の引数にはダイアログに設置される1つ目のボタンに表示される文字列を指定して下さい。
5番目の引数には「DialogInterface.OnClickListener」インターフェースを実装したクラスのオブジェクトを指定します。1つ目のボタンがクリックされた時のイベント処理を行う部分となります
6番目の引数にはダイアログに設置される2つ目のボタンに表示される文字列を指定して下さい。
7番目の引数には「DialogInterface.OnClickListener」インターフェースを実装したクラスのオブジェクトを指定します。2つ目のボタンがクリックされた時のイベント処理を行う部分となります
8番目の引数にはエミュレーターの「Back」キー(又はキーボードの「ESC」キー)を有効にするかどうかを設定します。「true」を設定した場合は通常と同じく「Back」キーによって一つ前の画面に戻ります。「false」を設定した場合は「Back」キーが無効となりボタンをクリックしないとダイアログは閉じません。
9番目の引数には「DialogInterface.OnCancelListener」インターフェースを実装したクラスのオブジェクトを指定します。6番目の引数で「true」が設定された場合にキャンセル処理が行われた時のイベント処理を行う部分となります。後のサンプルでは自分自身に「DialogInterface.OnCancelListener」インターフェースを実装してます。このような場合は自分自身を表す「this」を指定します。
※「DialogInterface.OnClickListener」インターフェースの詳細については「DialogInterface.OnClickListenerインターフェース」を参照して下さい)。
※「DialogInterface.OnCancelListener」インターフェースの詳細については「DialogInterface.OnCancelListenerインターフェース」を参照して下さい)。
具体的には次のように記述します。
package jp.javadrive.android;

import android.app.Activity;
import android.os.Bundle;
import android.app.AlertDialog;
import android.content.DialogInterface;
import android.widget.EditText;


public class Test extends Activity implements
    DialogInterface.OnClickListener, DialogInterface.OnCancelListener{

    @Override protected void onCreate(Bundle icicle) {
        super.onCreate(icicle);

        EditText edit = new EditText(Test05_01.this);
        edit.setWidth(50);

        AlertDialog.show(this, "Test", edit, "yes", this,
          "no", this, true, this);
    }

    public void onClick(DialogInterface dialog, int whichButton) {
        if (whichButton == DialogInterface.BUTTON1){
            /* .... */
        }else if (whichButton == DialogInterface.BUTTON2){
            /* .... */
        }
    }

    public void onCancel(DialogInterface dialog) {
    }
}
※簡略化するために上記のように記述していますが、上記では一瞬表示されて消えてしまいます。より具体的には下記のサンプルを見てください。
サンプルプログラム
それでは実際に試してみます。プロジェクトを作成しソースコードを次のように変更しました。
package jp.javadrive.android;

import android.app.Activity;
import android.os.Bundle;
import android.widget.LinearLayout;
import android.view.View;
import android.view.ViewGroup;
import android.widget.Button;
import android.widget.TextView;
import android.widget.EditText;
import android.app.AlertDialog;
import android.content.DialogInterface;

public class Test05_01 extends Activity implements DialogInterface.OnClickListener{

    private final int WRAP_CONTENT = ViewGroup.LayoutParams.WRAP_CONTENT;
    private TextView tv;
    private EditText edit;

    @Override protected void onCreate(Bundle icicle) {
        super.onCreate(icicle);

        LinearLayout linearLayout = new LinearLayout(this);
        linearLayout.setOrientation(LinearLayout.VERTICAL);
        setContentView(linearLayout);

        final Button button = new Button(this);
        button.setText("Open Dialog");
        button.setOnClickListener(new View.OnClickListener() {
            public void onClick(View v) {
                edit = new EditText(Test05_01.this);
                edit.setWidth(50);

                AlertDialog.show(Test05_01.this,
                                 "Alert Test",
                                 edit,
                                 "OK",
                                 Test05_01.this,
                                 "Cancel",
                                 Test05_01.this,
                                 false,
                                 null);
            }
        });
        linearLayout.addView(button,
          new LinearLayout.LayoutParams(WRAP_CONTENT, WRAP_CONTENT));

        tv = new TextView(this);
        linearLayout.addView(tv,
          new LinearLayout.LayoutParams(WRAP_CONTENT, WRAP_CONTENT));
    }

    public void onClick(DialogInterface dialog, int whichButton) {
        if (whichButton == DialogInterface.BUTTON1){
            tv.setText(edit.getText());
        }
    }
}
ビルド後にエミュレーター上で実行します。
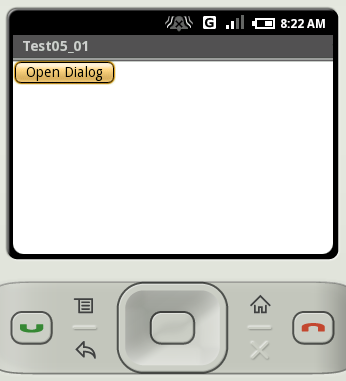
画面に表示されたボタンをクリックして下さい。ダイアログが表示されます。
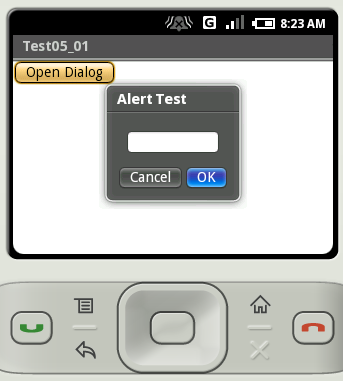
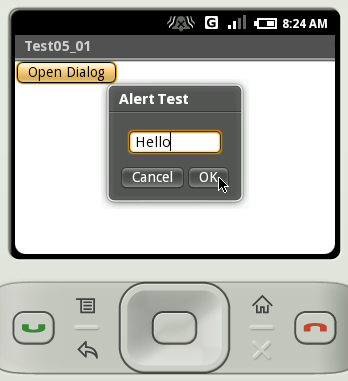
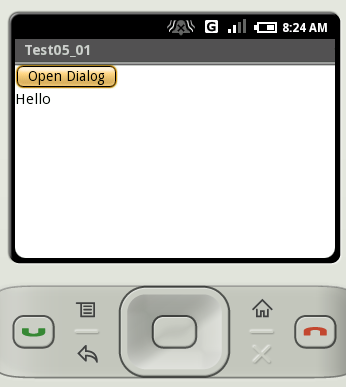
ダイアログに表示されたテキストボックスに何か文字を入力して「OK」ボタンをクリックして下さい。ダイアログが閉じ、ダイアログのテキストボックスに入力した文字が画面に表示されます。
( Written by Tatsuo Ikura )

著者 / TATSUO IKURA
プログラミングや開発環境構築の解説サイトを運営しています。