コンボボックスに画像を表示する
ListCellRendererの応用としてコンボボックスに画像を表示する方法を確認します。
ListCellRendererインターフェースを実装する時にJLabelクラスをベースとしている場合は、コンボボックスの各項目はラベルとして表示されています。そこでラベルに対して画像を設定することでコンボボックスの各項目に画像を表示させることができます。
もし同じ画像を全ての項目で表示するのであれば「getListCellRendererComponent」メソッドの中で「setIcon」メソッドを使って画像を設定するだけです。そうではなく項目毎に表示したい画像を指定したい場合には、何らかの形で画像の情報を「getListCellRendererComponent」メソッドに渡す必要が出てきます。
そこでJComboBoxクラスで追加できるデータはString型ではなくObject型となっていますので、画像とテキストの両方の情報を持ったクラスを別に用意して、JComboBoxクラスには作成した独自クラスのオブジェクトを格納するようにします。
class ComboLabel{
  String text;
  Icon icon;

  ComboLabel(String text, Icon icon){
    this.text = text;
    this.icon = icon;
  }

  public String getText(){
    return text;
  }

  public Icon getIcon(){
    return icon;
  }
}
上記のクラスは文字列とアイコンの2つの情報を持つだけのクラスです。項目毎にこのクラスのオブジェクトを作成し、JComboBoxクラスのオブジェクトに追加します。
DefaultComboBoxModel model = new DefaultComboBoxModel();
model.addElement(new ComboLabel("Text1", new ImageIcon("gazou1.png")));
model.addElement(new ComboLabel("Text2", new ImageIcon("gazou2.png")));
model.addElement(new ComboLabel("Text3", new ImageIcon("gazou3.png")));
model.addElement(new ComboLabel("Text4", new ImageIcon("gazou4.png")));

JComboBox combo = new JComboBox(model);
次に「getListCellRendererComponent」メソッド内で処理を記述する時に、2番目の引数として渡されてきたObject型の値を自分で定義したクラス(今回の場合はComboLabelクラス)にキャストして取り出します。これで項目毎の独自クラスのオブジェクトが取得できますので、テキストと画像の情報を取得してJLabelクラスを継承しているレンダラクラスに設定します。
class MyCellRenderer extends JLabel implements ListCellRenderer {
  public Component getListCellRendererComponent(
            JList list,
            Object value,
            int index,
            boolean isSelected,
            boolean cellHasFocus){

      ComboLabel data = (ComboLabel)value;
      setText(data.getText());
      setIcon(data.getIcon());

    return this;
  }
}
これでコンボボックスの各項目毎にテキストと画像を表示することが出来るようになります。
サンプルプログラム
では簡単なサンプルを作成して試してみます。
※今回使用させて頂いた画像は『牛飼いとアイコンの部屋』で公開されている画像を使用させて頂いています。
import javax.swing.*;
import java.awt.Color;
import java.awt.Dimension;
import java.awt.BorderLayout;
import java.awt.Component;

public class JComboBoxTest18 extends JFrame{

  public static void main(String[] args){
    JComboBoxTest18 frame = new JComboBoxTest18();

    frame.setDefaultCloseOperation(JFrame.EXIT_ON_CLOSE);
    frame.setBounds(10, 10, 300, 200);
    frame.setTitle("タイトル");
    frame.setVisible(true);
  }

  JComboBoxTest18(){
    DefaultComboBoxModel model = new DefaultComboBoxModel();
    model.addElement(new ComboLabel("Lion", new ImageIcon("./img/reo1s.png")));
    model.addElement(new ComboLabel("Elephant", new ImageIcon("./img/zou1s.png")));
    model.addElement(new ComboLabel("Ostrich", new ImageIcon("./img/dacho_s.png")));
    model.addElement(new ComboLabel("Hippo", new ImageIcon("./img/hip03s.png")));

    JComboBox combo = new JComboBox(model);

    MyCellRenderer renderer = new MyCellRenderer();
    combo.setRenderer(renderer);

    JPanel p = new JPanel();
    p.add(combo);

    getContentPane().add(p, BorderLayout.CENTER);
  }

  class ComboLabel{
    String text;
    Icon icon;

    ComboLabel(String text, Icon icon){
      this.text = text;
      this.icon = icon;
    }

    public String getText(){
      return text;
    }

    public Icon getIcon(){
      return icon;
    }
  }

  class MyCellRenderer extends JLabel implements ListCellRenderer{

    MyCellRenderer(){
      setOpaque(true);
    }

    public Component getListCellRendererComponent(
            JList list,
            Object value,
            int index,
            boolean isSelected,
            boolean cellHasFocus){

      ComboLabel data = (ComboLabel)value;
      setText(data.getText());
      setIcon(data.getIcon());

      if (isSelected){
        setForeground(Color.white);
        setBackground(Color.black);
      }else{
        setForeground(Color.black);
        setBackground(Color.white);
      }

      return this;
    }
  }
}
上記をコンパイルした後で実行すると次のように表示されます。
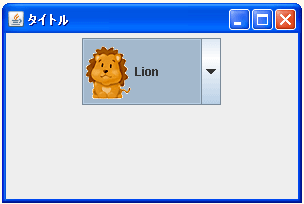
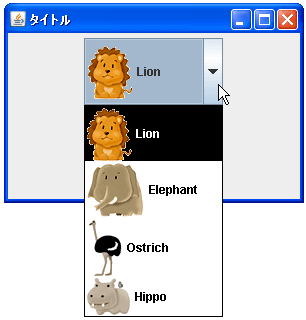
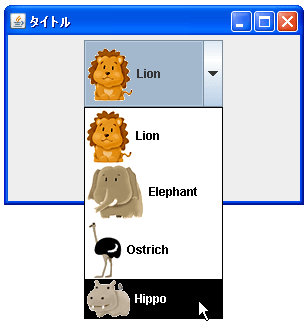
なお、コンボボックスのサイズを明示的に指定していなければ、画像が表示出来るように自動的にサイズの調整は行われます。
( Written by Tatsuo Ikura )

著者 / TATSUO IKURA
これから IT 関連の知識を学ばれる方を対象に、色々な言語でのプログラミング方法や関連する技術、開発環境構築などに関する解説サイトを運営しています。