セル内でのコンポーネントのサイズを変更する
広告
コンポーネントをセルに配置する場合、セルの大きさよりもコンポーネントの大きさが小さい時にコンポーネントのサイズを変更するかどうかを指定します。
コンポーネントのサイズを変更するには「fill」フィールドに設定します。
public int fill
コンポーネントの表示領域がコンポーネントの必須サイズよりも大きいときに使
用されます。これは、コンポーネントをサイズ変更するかどうかを指定し、サイ
ズ変更を行う場合にはその方法も指定します。

fill には、次の値が有効です。

  NONE:コンポーネントのサイズを変更しません。
  HORIZONTAL:コンポーネントの幅を水平表示領域の最大サイズにし、高さは変
    更しません。
  VERTICAL:コンポーネントの高さを垂直表示領域の最大サイズにし、幅は変更
    しません。
  BOTH:コンポーネントを表示領域の最大サイズにします。

デフォルト値は NONE です。
サイズを調整するかどうかを表す値を指定します。指定可能な値は次の通りです。
| 値 | サイズの変更方法 |
|---|---|
| GridBagConstraints.NONE | サイズを変更しません |
| GridBagConstraints.HORIZONTAL | 水平方向にいっぱいまで拡大する |
| GridBagConstraints.VERTICAL | 垂直方向にいっぱいまで拡大する |
| GridBagConstraints.BOTH | 水平及び垂直方向にいっぱいまで拡大する |
実際の使い方は次のようになります。
JPanel panel = new JPanel();
panel.setLayout(new GridBagLayout());

JButton button1 = new JButton("button1");
JButton button2 = new JButton("button2");

GridBagConstraints gbc = new GridBagConstraints();

gbc.gridx = 0;
gbc.gridy = 0;
gbc.gridwidth = 1;
gbc.gridheight = 2;
gbc.weightx = 1.0d;
gbc.fill = GridBagConstraints.BOTH;
layout.setConstraints(button1, gbc);

gbc.gridx = 1;
gbc.gridy = 0;
gbc.gridwidth = 1;
gbc.gridheight = 1;
gbc.weightx = 1.0d;
gbc.fill = GridBagConstraints.HORIZONTAL;
layout.setConstraints(button2, gbc);

p.add(button1);
p.add(button2);
サンプルプログラム
では簡単なサンプルを作成して試してみます。
import javax.swing.*;
import java.awt.Font;
import java.awt.GridBagLayout;
import java.awt.GridBagConstraints;
import java.awt.BorderLayout;

public class GridBagLayoutTest6 extends JFrame{

  public static void main(String[] args){
    GridBagLayoutTest6 frame = new GridBagLayoutTest6();

    frame.setDefaultCloseOperation(JFrame.EXIT_ON_CLOSE);
    frame.setBounds(10, 10, 300, 200);
    frame.setTitle("タイトル");
    frame.setVisible(true);
  }

  GridBagLayoutTest6(){
    GridBagLayout layout = new GridBagLayout();
    JPanel p = new JPanel();
    p.setLayout(layout);

    GridBagConstraints gbc = new GridBagConstraints();

    JButton button1 = new JButton("Google");

    gbc.gridx = 0;
    gbc.gridy = 0;
    gbc.gridheight = 2;
    gbc.weightx = 1.0d;
    gbc.weighty = 1.0d;
    gbc.fill = GridBagConstraints.VERTICAL;
    layout.setConstraints(button1, gbc);

    JButton button2 = new JButton("Yahoo!");
    button2.setFont(new Font("Arial", Font.PLAIN, 30));

    gbc.gridx = 1;
    gbc.gridy = 0;
    gbc.gridheight = 1;
    gbc.weightx = 1.0d;
    gbc.weighty = 1.0d;
    gbc.fill = GridBagConstraints.BOTH;
    layout.setConstraints(button2, gbc);

    JButton button3 = new JButton("MSN");

    gbc.gridx = 1;
    gbc.gridy = 1;
    gbc.weightx = 1.0d;
    gbc.weighty = 1.0d;
    gbc.fill = GridBagConstraints.HORIZONTAL;
    layout.setConstraints(button3, gbc);

    p.add(button1);
    p.add(button2);
    p.add(button3);

    getContentPane().add(p, BorderLayout.CENTER);
  }
}
上記をコンパイルした後で実行すると次のように表示されます。
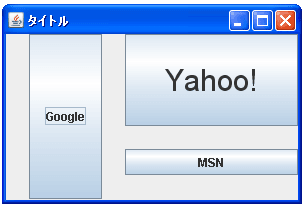
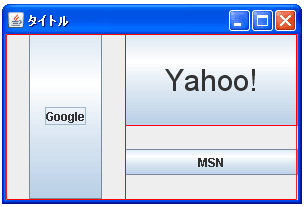
今回は全てのコンポーネントをデフォルトの中央に表示した状態で左側のコンポーネントは垂直方向に拡大し、右上のコンポーネントは水平及び垂直方向に拡大、右下のコンポーネントは水平方向に拡大しています。分かりやすいように各セルを線で囲んで表示すると次のようになります。
( Written by Tatsuo Ikura )

著者 / TATSUO IKURA
これから IT 関連の知識を学ばれる方を対象に、色々な言語でのプログラミング方法や関連する技術、開発環境構築などに関する解説サイトを運営しています。