セル内で値を表示する水平位置及び垂直位置
セルの大きさがセルに表示される値よりも大きい場合に、値をセル内のどの位置に表示するかをスタイルに設定する方法を確認します。指定は水平方向及び垂直方向のそれぞれに設定します。
水平方向の位置
セル内の水平方向の位置を設定するにはCellStyleインターフェースで用意されているsetAlignmentメソッドを使います。
void setAlignment(short align)
set the type of horizontal alignment for the cell

Parameters:
  align - - the type of alignment
引数には位置を表すshort型の値を指定します。指定可能な値はCellStyleインターフェースで定義されており次のいずれかとなります。
CellStyle.ALIGN_GENERAL            標準
CellStyle.ALIGN_LEFT               左詰め(インデント)
CellStyle.ALIGN_CENTER             中央揃え
CellStyle.ALIGN_RIGHT              右詰め(インデント)
CellStyle.ALIGN_FILL               繰り返し
CellStyle.ALIGN_JUSTIFY            両端揃え
CellStyle.ALIGN_CENTER_SELECTION   選択範囲内で中央
それぞれの値を設定した場合、どのように水平位置が設定されるのかはこの後のサンプルを参照して下さい。
実際の使い方は次のようになります。
Workbook wb = new HSSFWorkbook();
DataFormat format = wb.createDataFormat();

CellStyle  style = wb.createCellStyle();
style.setAlignment(CellStyle.ALIGN_CENTER);
この場合は、水平方向の位置として中央揃えを行います。
サンプルプログラム
実際に試してみましょう。
import org.apache.poi.hssf.usermodel.HSSFWorkbook;
import org.apache.poi.ss.usermodel.*;
import org.apache.poi.openxml4j.exceptions.InvalidFormatException;
import java.io.*;

public class Sample7_1{
  public static void main(String[] args){
    Workbook wb = new HSSFWorkbook();
    Sheet sheet = wb.createSheet();
    sheet.setColumnWidth(2, 3072);

    Row[] row = new Row[7];
    Cell[] cell = new Cell[7];

    for (int i = 0 ; i < 7 ; i++){
      row[i] = sheet.createRow(i + 1);
      cell[i] = row[i].createCell(2);
      cell[i].setCellValue("Please give me a receipt");
    }

    CellStyle style0 = wb.createCellStyle();
    style0.setAlignment(CellStyle.ALIGN_GENERAL);
    cell[0].setCellStyle(style0);

    CellStyle style1 = wb.createCellStyle();
    style1.setAlignment(CellStyle.ALIGN_LEFT);
    cell[1].setCellStyle(style1);

    CellStyle style2 = wb.createCellStyle();
    style2.setAlignment(CellStyle.ALIGN_CENTER);
    cell[2].setCellStyle(style2);

    CellStyle style3 = wb.createCellStyle();
    style3.setAlignment(CellStyle.ALIGN_RIGHT);
    cell[3].setCellStyle(style3);

    CellStyle style4 = wb.createCellStyle();
    style4.setAlignment(CellStyle.ALIGN_FILL);
    cell[4].setCellStyle(style4);

    CellStyle style5 = wb.createCellStyle();
    style5.setAlignment(CellStyle.ALIGN_JUSTIFY);
    cell[5].setCellStyle(style5);

    CellStyle style6 = wb.createCellStyle();
    style6.setAlignment(CellStyle.ALIGN_CENTER_SELECTION);
    cell[6].setCellStyle(style6);

    FileOutputStream out = null;
    try{
      out = new FileOutputStream("sample7_1.xls");
      wb.write(out);
    }catch(IOException e){
      System.out.println(e.toString());
    }finally{
      try {
        out.close();
      }catch(IOException e){
        System.out.println(e.toString());
      }
    }
  }
}
各セルに対して別々の水平位置のスタイルを設定しています。それでは作成されたExcelファイルを開いてみます。
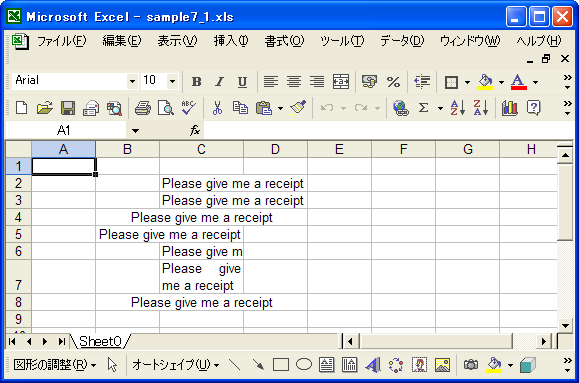
セル内で値がどのように表示されるのかは設定したスタイルによって変わることが確認できます。
垂直方向の位置
セル内の垂直方向の位置を設定するにはCellStyleインターフェースで用意されているsetVerticalAlignmentメソッドを使います。
void setVerticalAlignment(short align)
set the type of vertical alignment for the cell

Parameters:
  align - the type of alignment
引数には位置を表すshort型の値を指定します。指定可能な値はCellStyleインターフェースで定義されており次のいずれかとなります。
CellStyle.VERTICAL_TOP       上詰め
CellStyle.VERTICAL_CENTER    中央揃え
CellStyle.VERTICAL_BOTTOM    下詰め
CellStyle.VERTICAL_JUSTIFY   両端揃え
それぞれの値を設定した場合、どのように垂直位置が設定されるのかはこの後のサンプルを参照して下さい。
実際の使い方は次のようになります。
Workbook wb = new HSSFWorkbook();
DataFormat format = wb.createDataFormat();

CellStyle  style = wb.createCellStyle();
style.setVerticalAlignment(CellStyle.VERTICAL_CENTER);
この場合は、垂直方向の位置として中央揃えを行います。
サンプルプログラム
実際に試してみましょう。
import org.apache.poi.hssf.usermodel.HSSFWorkbook;
import org.apache.poi.ss.usermodel.*;
import org.apache.poi.openxml4j.exceptions.InvalidFormatException;
import java.io.*;

public class Sample7_2{
  public static void main(String[] args){
    Workbook wb = new HSSFWorkbook();
    Sheet sheet = wb.createSheet();

    Row row = sheet.createRow(1);
    row.setHeightInPoints(70);
    Cell[] cell = new Cell[4];

    for (int i = 0 ; i < 4 ; i++){
      cell[i] = row.createCell(i + 1);
      cell[i].setCellValue("Please give me a receipt");
    }

    CellStyle style0 = wb.createCellStyle();
    style0.setVerticalAlignment(CellStyle.VERTICAL_TOP);
    cell[0].setCellStyle(style0);

    CellStyle style1 = wb.createCellStyle();
    style1.setVerticalAlignment(CellStyle.VERTICAL_CENTER);
    cell[1].setCellStyle(style1);

    CellStyle style2 = wb.createCellStyle();
    style2.setVerticalAlignment(CellStyle.VERTICAL_BOTTOM);
    cell[2].setCellStyle(style2);

    CellStyle style3 = wb.createCellStyle();
    style3.setVerticalAlignment(CellStyle.VERTICAL_JUSTIFY);
    cell[3].setCellStyle(style3);

    FileOutputStream out = null;
    try{
      out = new FileOutputStream("sample7_2.xls");
      wb.write(out);
    }catch(IOException e){
      System.out.println(e.toString());
    }finally{
      try {
        out.close();
      }catch(IOException e){
        System.out.println(e.toString());
      }
    }
  }
}
各セルに対して別々の垂直方向のスタイルを設定しています。それでは作成されたExcelファイルを開いてみます。
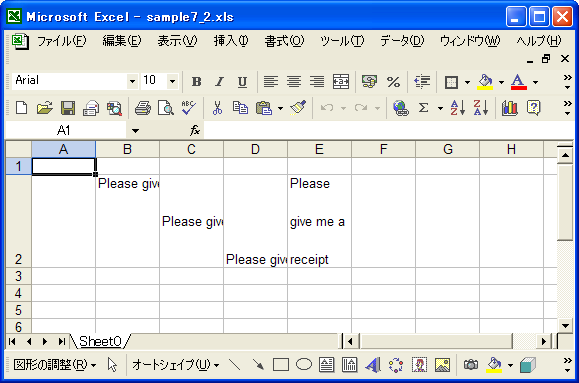
セル内で値がどのように表示されるのかは設定したスタイルによって変わることが確認できます。
( Written by Tatsuo Ikura )

著者 / TATSUO IKURA
これから IT 関連の知識を学ばれる方を対象に、色々な言語でのプログラミング方法や関連する技術、開発環境構築などに関する解説サイトを運営しています。