フォントの設定
フォントに関するスタイルを設定するには、まずorg.apache.poi.ss.usermodel.Fontインターフェースを実装したクラスのオブジェクトを作成します。そして作成されたオブジェクトに対してFontインターフェースで用意されているメソッドを使って色々な設定を行います。
ではまずFontインターフェースを実装したクラスのオブジェクトを作成します。作成するにはWorkbookインターフェースで用意されているcreateFontメソッドを使います。
Font createFont()
Create a new Font and add it to the workbook's font table

Returns:
  new font object
メソッドを実行すると新しいFontインターフェースを実装したクラスのオブジェクトを作成します。
実際の使い方は次のようになります。
Workbook wb = new HSSFWorkbook();
Font font = wb.createFont();
このオブジェクトに対して設定を行っていきます。
フォント名の設定
フォント名を設定するにはFontインターフェースで用意されているsetFontNameメソッドを使います。
void setFontName(java.lang.String name)
set the name for the font (i.e. Arial)

Parameters:
  name - String representing the name of the font to use
引数には"Arial"などのようにフォント名を文字列で指定して下さい。
フォントサイズの設定
フォントサイズを設定するにはFontインターフェースで用意されているsetFontHeightInPointsメソッドを使います。
void setFontHeightInPoints(short height)
set the font height

Parameters:
  height - height in the familiar unit of measure - points
引数にはフォントサイズをshort型の値として指定します。単位はポイントです。
色の設定
フォントの色を設定するにはFontインターフェースで用意されているsetColorメソッドを使います。
void setColor(short color)
set the color for the font

Parameters:
  color - to use
引数には線の色を表すshort型の値を指定します。標準パレットに含まれている色については「org.apache.poi.ss.usermodel.IndexedColors」にて列挙型として定義されています。列挙されている値や指定方法は「前景色と背景色」を参照して下さい。
フォントの装飾の設定
フォントの装飾はボールド、イタリック、アンダーライン、取り消し線の4つが指定可能です。まずボールドを設定するにはFontインターフェースで用意されているsetBoldweightメソッドを使います。
void setBoldweight(short boldweight)
--
指定可能な値はFontインターフェースで定義されており Font.BOLDWEIGHT_BOLD か Font.BOLDWEIGHT_NORMAL のいずれかです。ボールドを設定したい場合には Font.BOLDWEIGHT_BOLD を指定して下さい。
イタリックを設定するにはFontインターフェースで用意されているsetItalicメソッドを使います。
void setItalic(boolean italic)
set whether to use italics or not

Parameters:
  italic - italics or not
引数にはboolean型の値を指定します。イタリックを設定したい場合にはtrueを指定して下さい。
アンダーラインを設定するにはFontインターフェースで用意されているsetUnderlineメソッドを使います。
void setUnderline(byte underline)
set type of text underlining to use

Parameters:
  underline - type
引数にはアンダーラインの種類を表すbyte型の値を指定します。指定可能な値はFontインターフェースで定義されており次のいずれかです。
Font.U_NONE
Font.U_SINGLE
Font.U_DOUBLE
Font.U_SINGLE_ACCOUNTING
Font.U_DOUBLE_ACCOUNTING
取り消し線を設定するにはFontインターフェースで用意されているsetStrikeoutメソッドを使います。
void setStrikeout(boolean strikeout)
set whether to use a strikeout horizontal line through the text or not

Parameters:
  strikeout - or not
引数にはboolean型の値を指定します。取り消し線を設定したい場合にはtrueを指定して下さい。
フォントをスタイルに設定
フォントをスタイルに設定するにはCellStyleインターフェースで用意されているsetFontメソッドを使います。
void setFont(Font font)
set the font for this style

Parameters:
  font - a font object created or retreived from the Workbook object
引数にはFontインターフェースを実行したクラスのオブジェクトを指定して下さい。
実際の使い方は次のようになります。
Workbook wb = new HSSFWorkbook();
Font font = wb.createFont();
font.setBoldweight(Font.BOLDWEIGHT_BOLD);
font.setFontHeightInPoints((short)20);

CellStyle style = wb.createCellStyle();
style.setFont(font);
フォントサイズとボールドを設定したフォントをスタイルに設定しています。
サンプルプログラム
実際に試してみましょう。
import org.apache.poi.hssf.usermodel.HSSFWorkbook;
import org.apache.poi.ss.usermodel.*;
import org.apache.poi.openxml4j.exceptions.InvalidFormatException;
import java.io.*;

public class Sample5_1{
  public static void main(String[] args){
    Workbook wb = new HSSFWorkbook();
    Sheet sheet = wb.createSheet();
    sheet.setColumnWidth(1, 4096);
    sheet.setColumnWidth(2, 4096);

    Row row1 = sheet.createRow(1);
    Row row2 = sheet.createRow(2);

    Cell cell1_1 = row1.createCell(1);
    cell1_1.setCellValue("Sample");

    Cell cell2_1 = row2.createCell(1);
    cell2_1.setCellValue("Sample");

    Font font1 = wb.createFont();
    font1.setBoldweight(Font.BOLDWEIGHT_BOLD);
    font1.setFontHeightInPoints((short)14);

    Font font2 = wb.createFont();
    font2.setItalic(true);
    font2.setFontHeightInPoints((short)20);
    font2.setFontName("Century Gothic");

    CellStyle style1 = wb.createCellStyle();
    style1.setFont(font1);
    cell1_1.setCellStyle(style1);

    CellStyle style2 = wb.createCellStyle();
    style2.setFont(font2);
    cell2_1.setCellStyle(style2);

    FileOutputStream out = null;
    try{
      out = new FileOutputStream("sample5_1.xls");
      wb.write(out);
    }catch(IOException e){
      System.out.println(e.toString());
    }finally{
      try {
        out.close();
      }catch(IOException e){
        System.out.println(e.toString());
      }
    }
  }
}
フォントを設定した2つのスタイルを作成し、別々のセルに対して設定しています。それでは作成されたExcelファイルを開いてみます。
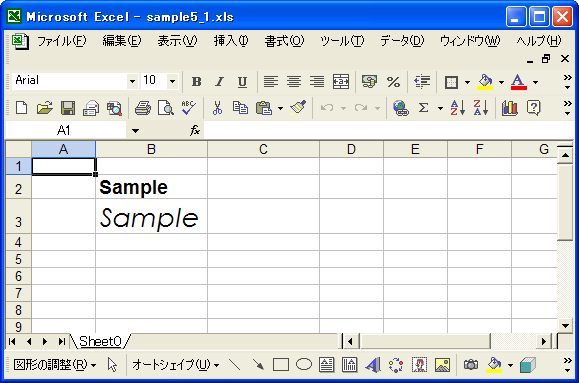
フォントサイズやフォント名、フォントの装飾などが設定されていることが確認できます。
( Written by Tatsuo Ikura )

著者 / TATSUO IKURA
これから IT 関連の知識を学ばれる方を対象に、色々な言語でのプログラミング方法や関連する技術、開発環境構築などに関する解説サイトを運営しています。