塗りつぶしパターン
広告
セルは前景色だけでなく、背景色+パターンを設定することもできます。この場合、前景色の上に背景色で描かれたパターンが表示されることになります。
パターンを設定するにはCellStyleインターフェースで用意されているsetFillPatternメソッドを使います。
void setFillPattern(short fp)
setting to one fills the cell with the foreground color... No idea about other values

Parameters:
  fp - fill pattern (set to 1 to fill w/foreground color)
引数には塗りつぶしパターンを表すshort型の値を指定します。指定可能な値はCellStyleインターフェースで定義されており、次のいずれかの値となります。
NO_FILL               SOLID_FOREGROUND         FINE_DOTS
ALT_BARS              SPARSE_DOTS              THICK_HORZ_BANDS
THICK_VERT_BANDS      THICK_BACKWARD_DIAG      THICK_FORWARD_DIAG
BIG_SPOTS             BRICKS                   THIN_HORZ_BANDS
THIN_VERT_BANDS       THIN_BACKWARD_DIAG       THIN_FORWARD_DIAG
SQUARES               DIAMONDS
実際の使い方は次のようになります。
Workbook wb = new HSSFWorkbook();
CellStyle style = wb.createCellStyle();

style.setFillForegroundColor(IndexedColors.MAROON.getIndex());
style.setFillBackgroundColor(IndexedColors.SKY_BLUE.getIndex());
style.setFillPattern(CellStyle.DIAMONDS);
これで前景色に「MAROON」、背景色に「SKY_BLUE」、パターンに「DIAMONDS」が設定されたスタイルが作成されました。
実際にどのように表示されるのは次のサンプルでご確認下さい。
サンプルプログラム
実際に試してみましょう。
import org.apache.poi.hssf.usermodel.HSSFWorkbook;
import org.apache.poi.ss.usermodel.*;
import org.apache.poi.openxml4j.exceptions.InvalidFormatException;
import java.io.*;

public class Sample3_1{
  public static void main(String[] args){
    Workbook wb = new HSSFWorkbook();
    Sheet sheet = wb.createSheet();
    sheet.setColumnWidth(0, 4096);
    sheet.setColumnWidth(1, 4096);
    sheet.setColumnWidth(2, 4096);

    Row row1 = sheet.createRow(1);
    row1.setHeightInPoints(70);

    Cell cell1_0 = row1.createCell(0);
    Cell cell1_1 = row1.createCell(1);
    Cell cell1_2 = row1.createCell(2);

    cell1_0.setCellValue("THIN_VERT_BANDS");
    cell1_1.setCellValue("BIG_SPOTS");
    cell1_2.setCellValue("THICK_HORZ_BANDS");

    CellStyle style1 = wb.createCellStyle();
    style1.setFillPattern(CellStyle.THIN_VERT_BANDS);
    style1.setFillForegroundColor(IndexedColors.WHITE.getIndex());
    style1.setFillBackgroundColor(IndexedColors.BLUE.getIndex());

    CellStyle style2 = wb.createCellStyle();
    style2.setFillPattern(CellStyle.BIG_SPOTS);
    style2.setFillForegroundColor(IndexedColors.RED.getIndex());
    style2.setFillBackgroundColor(IndexedColors.WHITE.getIndex());

    CellStyle style3 = wb.createCellStyle();
    style3.setFillPattern(CellStyle.THICK_HORZ_BANDS);
    style3.setFillForegroundColor(IndexedColors.PINK.getIndex());
    style3.setFillBackgroundColor(IndexedColors.BROWN.getIndex());

    cell1_0.setCellStyle(style1);
    cell1_1.setCellStyle(style2);
    cell1_2.setCellStyle(style3);

    FileOutputStream out = null;
    try{
      out = new FileOutputStream("sample3_1.xls");
      wb.write(out);
    }catch(IOException e){
      System.out.println(e.toString());
    }finally{
      try {
        out.close();
      }catch(IOException e){
        System.out.println(e.toString());
      }
    }
  }
}
3つのセルに対してそれぞれ別のスタイルを作成し設定しています。それでは作成されたExcelファイルを開いてみます。
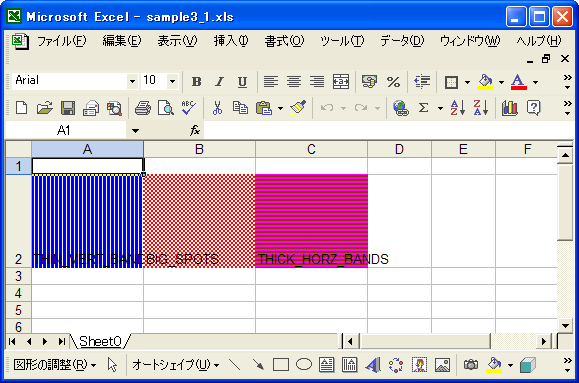
前景色、背景色、そして塗りつぶしパターンを変えて設定しました。他の塗りつぶしパターンについても同様に設定できます。
( Written by Tatsuo Ikura )

著者 / TATSUO IKURA
これから IT 関連の知識を学ばれる方を対象に、色々な言語でのプログラミング方法や関連する技術、開発環境構築などに関する解説サイトを運営しています。