項目を選択する
JListは利用者がマウスでクリックすることで項目を選択できますが、プログラムの方で選択する方法を見てみます。(ちなみにJListでマウスで選択する場合は、Ctrlボタンを押しながらクリックすることで離れた項目を複数選択できます。またShiftボタンを押しながら2つの項目をクリックすると、その間の全ての項目を選択できます)。
1つのセルを選択する時はJListクラスで用意されている"setSelectedIndex"メソッドを使います。
public void setSelectedIndex(int index)
単一セルを選択します。

パラメータ:
  index - 選択する単一セルのインデックス
複数のセルを選択する時はJListクラスで用意されている"setSelectedIndices"メソッドを使います。
public void setSelectedIndices(int[] indices)
セルのセットを選択します。

パラメータ:
  indices - 選択するセルのインデックスの配列
連続する区間のセルをまとめて選択する時はJListクラスで用意されている"setSelectionInterval"メソッドを使います。
public void setSelectionInterval(int anchor, int lead)
指定された区間を選択します。anchor および lead インデックスが含まれま
す。anchor が lead より小さくなくてもかまいません。selectionModel に委
譲する簡易メソッドです。anchor または leadが -1 の場合、
DefaultListSelectionModel 実装は何も行いません。anchor または leadが -1
未満の場合、IndexOutOfBoundsException がスローされます。

パラメータ:
  anchor - 選択する最初のインデックス
  lead - 選択する最後のインデックス
例外:
  IndexOutOfBoundsException - anchor または lead が -1 未満の場合
選択方法としては上記の3つのメソッドが使えます。1つだけの項目を選択するか、複数の項目をまとめて選択するか、連続する区間をまとめて選択するか、など使用目的に合わせてメソッドを使い分けて下さい。
では簡単なサンプルで試して見ましょう。
import javax.swing.*;
import java.awt.*;
import java.awt.event.*;
import javax.swing.event.*;
public class JListSample extends JFrame implements ActionListener{
protected JList list;
public static void main(String[] args){
JListSample test = new JListSample("JListSample");
/* 終了処理を変更 */
test.setDefaultCloseOperation(JFrame.EXIT_ON_CLOSE);
test.setBounds( 10, 10, 250, 180);
test.setVisible(true);
}
JListSample(String title){
setTitle(title);
/* JListの初期データ */
String[] initData = {"Blue", "Green", "Red", "Whit", "Black"};
list = new JList(initData);
JScrollPane sp = new JScrollPane();
sp.getViewport().setView(list);
sp.setPreferredSize(new Dimension(200, 80));
JPanel p = new JPanel();
p.add(sp);
getContentPane().add(p, BorderLayout.CENTER);
JButton indexButton = new JButton("Index");
indexButton.addActionListener(this);
indexButton.setActionCommand("indexButton");
JButton indicesButton = new JButton("Indices");
indicesButton.addActionListener(this);
indicesButton.setActionCommand("indicesButton");
JButton intervalButton = new JButton("Interval");
intervalButton.addActionListener(this);
intervalButton.setActionCommand("intervalButton");
JPanel p2 = new JPanel();
p2.add(indexButton);
p2.add(indicesButton);
p2.add(intervalButton);
getContentPane().add(p2, BorderLayout.SOUTH);
}
public void actionPerformed(ActionEvent e){
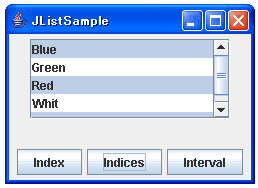
int[] indices = {0, 2, 4};
String actionCommand = e.getActionCommand();
if (actionCommand.equals("indexButton")){
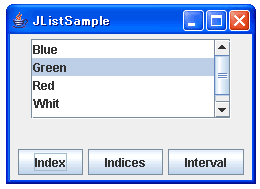
list.setSelectedIndex(1);
}else if (actionCommand.equals("indicesButton")){
list.setSelectedIndices(indices);
}else if (actionCommand.equals("intervalButton")){
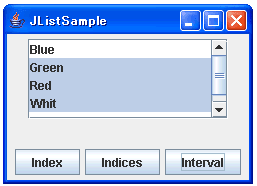
list.setSelectionInterval(1,3);
}else{
return;
}
}
}
実行結果は下記のようになります。
Indexボタンを押した時は下記のようになります。
Indicesボタンを押した時は下記のようになります。
Intervalボタンを押した時は下記のようになります。
これら3つのメソッドは選択項目を追加するわけではないので、今まで選択されていた項目をクリアして、新しく指定した項目を選択します。
追加で選択する場合と選択解除の方法
では次に既に選択されている項目をそのままに、他の項目を追加で選択する場合を見てみます。JListクラスで用意されている"addSelectionInterval"メソッドを使います。
public void addSelectionInterval(int anchor, int lead)
指定された区間を現在の選択に加えます。先頭および最終インデックスが含ま
れます。先頭インデックスが最終インデックスより小さくなくてもかまいませ
ん。

selectionModel に委譲する簡易メソッドです。anchor または leadが -1 の場
合、DefaultListSelectionModel 実装は何も行いません。anchor または leadが
 -1 未満の場合、IndexOutOfBoundsException がスローされます。

パラメータ:
  anchor - 選択に追加する最初のインデックス
  lead - 選択に追加する最後のインデックス
例外:
  IndexOutOfBoundsException - anchor または lead が -1 未満の場合
また既に選択されている項目から、指定した項目を選択解除する場合も見てみます。JListクラスで用意されている"removeSelectionInterval"メソッドを使います。
public void removeSelectionInterval(int index0, int index1)
選択範囲を、指定された区間と現在の選択範囲との差集合に設定します。index0
および index1 インデックスが削除されます。index0 が index1より小さくな
くてもかまいません。selectionModel に委譲する簡易メソッドです。index0
または index1が -1 の場合、DefaultListSelectionModel 実装は何も行いま
せん。index0 または index1が -1 未満の場合、IndexOutOfBoundsException
がスローされます。

パラメータ:
  index0 - 選択から削除する最初のインデックス
  index1 - 選択から削除する最後のインデックス
例外:
  IndexOutOfBoundsException - index0 または index1 が -1 未満の場合
このメソッドの場合は、今選択している状態をクリアせずに新しい項目を選択された状態にします。また追加及び選択解除するメソッドとしては、単独の項目を指定するメソッドが用意されておらず、どちらも開始項目と終了項目の範囲指定で行います。
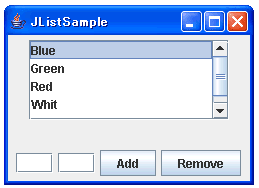
ではこちらも簡単なサンプルで試して見ます。
import javax.swing.*;
import java.awt.*;
import java.awt.event.*;
import javax.swing.event.*;

public class JListSample extends JFrame implements ActionListener{

  protected JList list;
  protected JTextField startText;
  protected JTextField endText;

  public static void main(String[] args){
    JListSample test = new JListSample("JListSample");

    /* 終了処理を変更 */
    test.setDefaultCloseOperation(JFrame.EXIT_ON_CLOSE);

    test.setBounds( 10, 10, 250, 180);
    test.setVisible(true);
  }

  JListSample(String title){
    setTitle(title);

    /* JListの初期データ */
    String[] initData = {"Blue", "Green", "Red", "Whit", "Black"};
    list = new JList(initData);

    JScrollPane sp = new JScrollPane();
    sp.getViewport().setView(list);
    sp.setPreferredSize(new Dimension(200, 80));

    JPanel p = new JPanel();
    p.add(sp);

    getContentPane().add(p, BorderLayout.CENTER);

    startText = new JTextField(2);
    endText = new JTextField(2);

    JButton addButton = new JButton("Add");
    addButton.addActionListener(this);
    addButton.setActionCommand("addButton");

    JButton removeButton = new JButton("Remove");
    removeButton.addActionListener(this);
    removeButton.setActionCommand("removeButton");

    JPanel p2 = new JPanel();
    p2.add(startText);
    p2.add(endText);
    p2.add(addButton);
    p2.add(removeButton);

    getContentPane().add(p2, BorderLayout.SOUTH);
  }

  public void actionPerformed(ActionEvent e){
    String actionCommand = e.getActionCommand();

    int start = Integer.parseInt(startText.getText().toString());
    int end = Integer.parseInt(endText.getText().toString());

    if (actionCommand.equals("addButton")){
      list.addSelectionInterval(start, end);
    }else if (actionCommand.equals("removeButton")){
      list.removeSelectionInterval(start, end);
    }else{
      return;
    }
  }
}
※上記サンプルはエラー処理も何もしていませんので、2つのテキストボックスには必ず値を両方とも入れて下さい。
実行結果は下記のようになります。
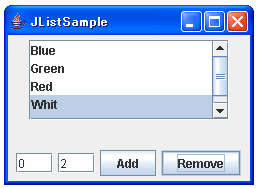
0番目をクリックして選択した状態を起点とすると下記のようになります。
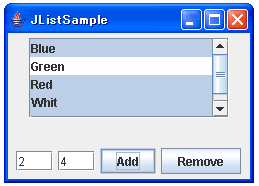
開始2番目、終了4番目を入力してAddボタンを押した時は下記のようになります。
開始0番目、終了2番目を入力してRemoveボタンを押した時は下記のようになります。
項目名で選択する方法
今までは、項目のIndex番号を指定して選択していましたが、実際の項目の内容をキーにして項目を選択することもできます。JListクラスで用意されている"setSelectedValue"メソッドを使います。
public void setSelectedValue(Object anObject, boolean shouldScroll)
指定されたオブジェクトをリストから選択します。

パラメータ:
  anObject - 選択するオブジェクト
  shouldScroll - オブジェクトが存在し、リストをスクロールして選択した
    オブジェクトを表示する場合は true。そうでない場合は false
引数の2番目でtrueを指定すると、選択した項目が画面上で表示されない位置にあった場合に、自動的にスクロールして表示される位置まで持ってくることができます。
これもサンプルで試してみます。
import javax.swing.*;
import java.awt.*;
import java.awt.event.*;
import javax.swing.event.*;

public class JListSample extends JFrame implements ActionListener{

  protected JList list;
  protected JTextField selectText;

  public static void main(String[] args){
    JListSample test = new JListSample("JListSample");

    /* 終了処理を変更 */
    test.setDefaultCloseOperation(JFrame.EXIT_ON_CLOSE);

    test.setBounds( 10, 10, 250, 180);
    test.setVisible(true);
  }

  JListSample(String title){
    setTitle(title);

    /* JListの初期データ */
    String[] initData = {"Blue", "Green", "Red", "Whit", "Black"};
    list = new JList(initData);

    JScrollPane sp = new JScrollPane();
    sp.getViewport().setView(list);
    sp.setPreferredSize(new Dimension(200, 80));

    JPanel p = new JPanel();
    p.add(sp);

    getContentPane().add(p, BorderLayout.CENTER);

    selectText = new JTextField(8);

    JButton selectButton = new JButton("Select");
    selectButton.addActionListener(this);
    selectButton.setActionCommand("selectButton");

    JPanel p2 = new JPanel();
    p2.add(selectText);
    p2.add(selectButton);

    getContentPane().add(p2, BorderLayout.SOUTH);
  }

  public void actionPerformed(ActionEvent e){
    String actionCommand = e.getActionCommand();

    String selectVal = selectText.getText();

    if (actionCommand.equals("selectButton")){
      list.setSelectedValue(selectVal, true);
    }else{
      return;
    }
  }
}
実行結果は下記のようになります。
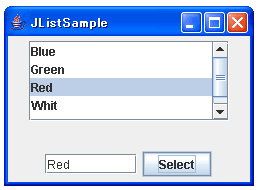
Redをテキストボックスに入力してSelectボタンを押した時は下記のようになります。
Blackをテキストボックスに入力してSelectボタンを押した時は下記のようになります。
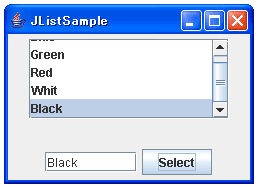
上記の2番目の実行結果のように、見えない位置にあったものが自動的に表示される位置までスクロールされます。
( Written by Tatsuo Ikura )

著者 / TATSUO IKURA
これから IT 関連の知識を学ばれる方を対象に、色々な言語でのプログラミング方法や関連する技術、開発環境構築などに関する解説サイトを運営しています。