ボタンに画像を表示する
ボタンには文字列だけではなく画像を表示することもできます。ここではボタンに画像を表示する方法について解説します。コンストラクタの引数に画像を指定する方法とラベルを作成したあとで setIcon メソッドを使って設定する方法をそれぞれ解説します。
(2022 年 04 月 11 日公開 / 2022 年 04 月 11 日更新)
ボタンに画像を表示する
最初に JButton のコンストラクタで画像を指定する方法です。次のコンストラクタを使用します。
public JButton(Icon icon)
アイコン付きのボタンを生成します。
パラメータ:
icon - ボタン上に表示するアイコン・イメージ
引数には表示したい画像を表す Icon インターフェースを実装したクラスのオブジェクトを指定します。 Java では Icon インターフェースを実装したクラスとして ImageIcon クラスが用意されており、今回は ImageIcon クラスのオブジェクトを指定してみます。( ImageIcon クラスについては「ImageIconクラス」を参照して下さい)。
実際の使い方は次のようになります。
ImageIcon icon = new ImageIcon("./img/sample.png");
JButton button = new JButton(icon);
PNG形式の画像からImageIconクラスのオブジェクトを作成し、ボタンのコンストラクタの引数に指定しています。
-- --
次にボタンを作成したあとで画像を設定する方法です。画像を設定するには JButton クラスの親クラスである AbstractButton クラスで定義されている setIcon メソッドを使います。
public void setIcon(Icon defaultIcon)
ボタンのデフォルトのアイコンを設定します。 明示的な指定がない場合、このアイコンはボタンが「押された」状態、および「無効な」状態を示すアイコンにも使用されます。
パラメータ:
defaultIcon - デフォルト状態の表示に使用されるアイコン
引数にはコンストラクタの場合と同じく Icon インターフェースを実装したクラスのオブジェクトを指定します。
実際の使い方は次のようになります。
ImageIcon icon = new ImageIcon("./img/sample.png");
JButton button = new JButton();
button.setIcon(icon);
サンプルプログラム
それでは簡単なサンプルプログラムを作って試してみます。テキストエディタで次のように記述したあと、 JSample8_1.java という名前で保存します。
import javax.swing.JFrame;
import javax.swing.JButton;
import javax.swing.JPanel;
import javax.swing.ImageIcon;
import java.awt.Container;
import java.awt.BorderLayout;

class JSample8_1 extends JFrame{
  public static void main(String args[]){
    JSample8_1 frame = new JSample8_1("MyTitle");
    frame.setVisible(true);
  }

  JSample8_1(String title){
    setTitle(title);
    setBounds(100, 100, 600, 400);
    setDefaultCloseOperation(JFrame.EXIT_ON_CLOSE);

    ImageIcon icon1 = new ImageIcon("./check.png");
    ImageIcon icon2 = new ImageIcon("./batsu.png");

    JButton button1 = new JButton(icon1);

    JButton button2 = new JButton();
    button2.setIcon(icon2);

    JPanel p = new JPanel();
    p.add(button1);
    p.add(button2);

    Container contentPane = getContentPane();
    contentPane.add(p, BorderLayout.CENTER);
  }
}
次のようにコンパイルを行います。
javac JSample8_1.java

コンパイルが終わりましたら実行します。
java JSample8_1
ボタンを 2 つ追加しました。 1 つ目のボタンはコンストラクタで画像を設定し、 2 つ目のボタンは作成したあとで画像を設定しています。
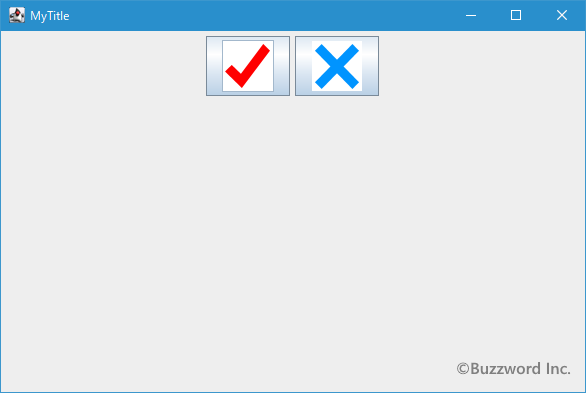
ボタンに画像を設定することができました。
ボタンに画像と文字列を両方表示する
ボタンには文字列と画像のどちらかではなく両方を表示することができます。次のコンストラクタを使用します。
public JButton(String text,
Icon icon)
初期テキストおよびアイコン付きのボタンを生成します。
パラメータ:
text - ボタンのテキスト
icon - ボタン上に表示するアイコン・イメージ
1 番目の引数にはボタンに表示する文字列を String クラスのオブジェクトで指定します。 2 番目の引数には前のコンストラクタと同じくIconインターフェースを実装したクラスのオブジェクトを指定します。
実際の使い方は次のようになります。
ImageIcon icon = new ImageIcon("./img/sample.png");
JButton button = new JButton("OK", icon);
文字列を引数に指定してボタンを作成したあとで setIcon メソッドを使って画像を設定することもできます。この場合、文字列が画像に置き換わるのではなく文字列に画像が追加されます。
ImageIcon icon = new ImageIcon("./img/sample.png");
JButton button = new JButton("OK");
button.setIcon(icon);
画像を引数に指定してボタンを作成したあとで setText メソッドを使って文字列を設定することもできます。この場合、画像が文字列に置き換わるのではなく画像に文字列が追加されます。
ImageIcon icon = new ImageIcon("./img/sample.png");
JButton button = new JButton(icon);
button.setText("OK");
なお文字列と画像の両方をボタンに表示した場合、デフォルトでは画像が左、文字列が右、という位置関係で表示されます。
サンプルプログラム
それでは簡単なサンプルプログラムを作って試してみます。テキストエディタで次のように記述したあと、 JSample8_2.java という名前で保存します。
import javax.swing.JFrame;
import javax.swing.JButton;
import javax.swing.JPanel;
import javax.swing.ImageIcon;
import java.awt.Container;
import java.awt.BorderLayout;

class JSample8_2 extends JFrame{
  public static void main(String args[]){
    JSample8_2 frame = new JSample8_2("MyTitle");
    frame.setVisible(true);
  }

  JSample8_2(String title){
    setTitle(title);
    setBounds(100, 100, 600, 400);
    setDefaultCloseOperation(JFrame.EXIT_ON_CLOSE);

    ImageIcon icon1 = new ImageIcon("./check.png");
    ImageIcon icon2 = new ImageIcon("./batsu.png");
    ImageIcon icon3 = new ImageIcon("./star.png");

    JButton button1 = new JButton("OK", icon1);

    JButton button2 = new JButton("Cancel");
    button2.setIcon(icon2);

    JButton button3 = new JButton(icon3);
    button3.setText("Good");

    JPanel p = new JPanel();
    p.add(button1);
    p.add(button2);
    p.add(button3);

    Container contentPane = getContentPane();
    contentPane.add(p, BorderLayout.CENTER);
  }
}
次のようにコンパイルを行います。
javac JSample8_2.java
コンパイルが終わりましたら実行します。
java JSample8_2
ボタンを 3 つ追加しました。 1 つ目のボタンはコンストラクタで文字列と画像を設定し、 2 つ目のボタンは文字列を指定して作成したあとで画像を設定し、 3 つ目のボタンは画像を指定して作成したあとで文字列を設定しています。
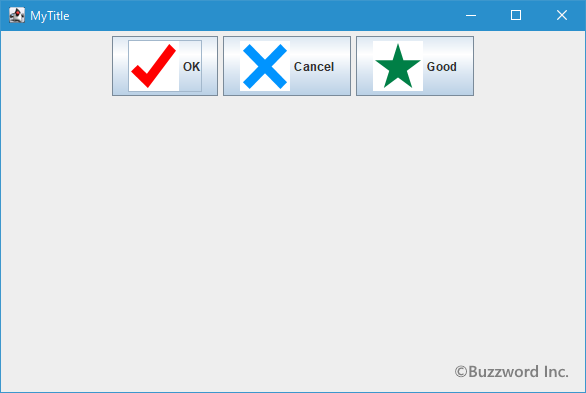
ボタンに画像と文字列を両方設定することができました。
-- --
ボタンに画像を表示する方法について解説しました。
( Written by Tatsuo Ikura )

著者 / TATSUO IKURA
プログラミングや開発環境構築の解説サイトを運営しています。