高さの設定
テキストボックスの高さを設定します。「EditText」クラスの親クラスである「TextView」クラスで用意されている「setHeight」メソッドを使います。
setHeight
public void setHeight(int pixels)
Makes the TextView exactly this many pixels tall. You could do the same
thing by specifying this number in the LayoutParams.

Related XML Attributes:
  android:height

Parameters:
  pixels  高さ(単位ピクセル)
テキストボックスとして文字を入力可能なエリアの高さを設定します。単位はピクセルです。
具体的には次のように記述します。
import android.app.Activity;
import android.os.Bundle;
import android.widget.EditText;

public class Test extends Activity {
    @Override protected void onCreate(Bundle icicle) {
        super.onCreate(icicle);

        EditText edit = new EditText(this);
        edit.setHeight(50);
        setContentView(edit);
    }
}
テキストボックスは指定の高さに設定されます。幅及び高さの両方が設定された場合、テキストボックスは固定のサイズとなります。この時に入りきらないほどのテキストを入力するとテキストボックスのサイズは変わりませんが下方向へ拡大されていきます(スクロールバーなどは無し)。
サンプルプログラム
それでは実際に試してみます。プロジェクトを作成しソースコードを次のように変更しました。
package jp.javadrive.android;
import android.app.Activity;
import android.os.Bundle;
import android.widget.LinearLayout;
import android.view.ViewGroup;
import android.widget.TextView;
import android.widget.EditText;
import android.widget.TextView.BufferType;
public class Test04_01 extends Activity {
private final int WRAP_CONTENT = ViewGroup.LayoutParams.WRAP_CONTENT;
@Override protected void onCreate(Bundle icicle) {
super.onCreate(icicle);
LinearLayout linearLayout = new LinearLayout(this);
linearLayout.setOrientation(LinearLayout.VERTICAL);
setContentView(linearLayout);
TextView tv = new TextView(this);
tv.setText("What's your name?");
linearLayout.addView(tv,
new LinearLayout.LayoutParams(WRAP_CONTENT, WRAP_CONTENT));
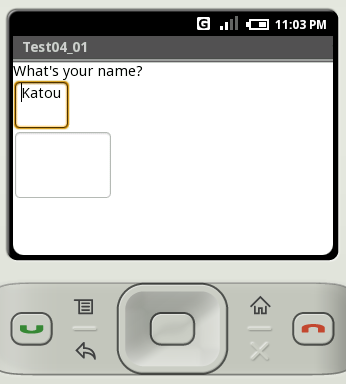
EditText edit1 = new EditText(this);
edit1.setText("Katou", BufferType.NORMAL);
edit1.setHeight(50);
linearLayout.addView(edit1,
new LinearLayout.LayoutParams(WRAP_CONTENT, WRAP_CONTENT));
EditText edit2 = new EditText(this);
edit2.setWidth(100);
edit2.setHeight(70);
linearLayout.addView(edit2,
new LinearLayout.LayoutParams(WRAP_CONTENT, WRAP_CONTENT));
}
}
ビルド後にエミュレーター上で実行します。
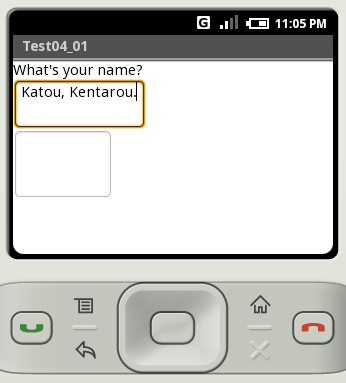
1つ目のテキストボックスでは幅を設定せずに高さだけを設定しています。この時は文字を追加で入力すると横方向には拡大されますが縦方向には拡大されません。
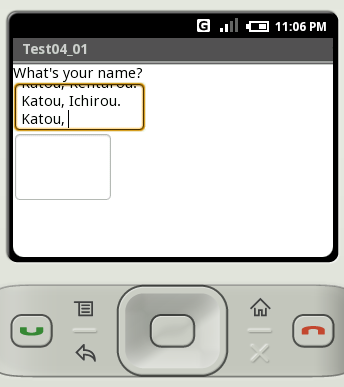
改行などを行っていくと、テキストボックス内では下へ拡張されますがテキストボックスの高さは設定された値からは変化がありません。
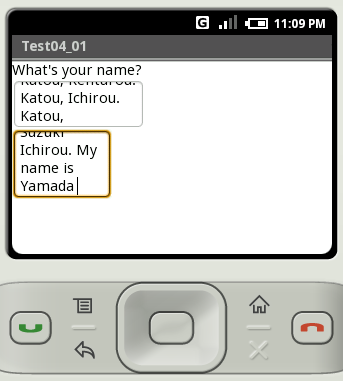
2つ目のテキストボックスでは幅と高さを設定していますのでテキストボックスの大きさは変わりがありません。入りきらない量の文字列を入力した場合には1つ目のテキストボックスと同様にテキストボックス内で下へ拡張されます。
( Written by Tatsuo Ikura )

著者 / TATSUO IKURA
プログラミングや開発環境構築の解説サイトを運営しています。