表示文字列の設定
テキストボックスの入力エリアに初期データとして表示される文字列を設定します。「EditText」クラスで用意されている「setText」メソッドを使います。
setText
public void setText(CharSequence text, BufferType type)
Sets the text that this TextView is to display (see setText(CharSequence))
and also sets whether it is stored in a styleable/spannable buffer and
whether it is editable.

Related XML Attributes:
  android:text
  android:bufferType

Parameters:
  text  表示文字列
  type  バッファータイプ
1番目の引数には表示する文字列を指定します。
2番目の引数には「android.widget.TextView.BufferType」クラスで定義されている3つの定数の1つを指定します。
BufferType  BufferType.EDITABLE
BufferType  BufferType.NORMAL
BufferType  BufferType.SPANNABLE
これらの違いが今のところ正確に分かっていません。取りあえず「BufferType.NORMAL」を指定しておきます。詳細が分かりましたら書き換えます。
具体的には次のように記述します。
import android.app.Activity;
import android.os.Bundle;
import android.widget.EditText;
import android.widget.TextView.BufferType;

public class Test extends Activity {
    @Override protected void onCreate(Bundle icicle) {
        super.onCreate(icicle);

        EditText edit = new EditText(this);
        edit.setWidth(50);
        edit.setText("Test", BufferType.NORMAL);
        setContentView(edit);
    }
}
サンプルプログラム
それでは実際に試してみます。プロジェクトを作成しソースコードを次のように変更しました。
package jp.javadrive.android;

import android.app.Activity;
import android.os.Bundle;
import android.widget.LinearLayout;
import android.view.ViewGroup;
import android.widget.TextView;
import android.widget.EditText;
import android.widget.TextView.BufferType;

public class Test03_01 extends Activity {
    private final int WRAP_CONTENT = ViewGroup.LayoutParams.WRAP_CONTENT;

    @Override protected void onCreate(Bundle icicle) {
        super.onCreate(icicle);

        LinearLayout linearLayout = new LinearLayout(this);
        linearLayout.setOrientation(LinearLayout.VERTICAL);
        setContentView(linearLayout);

        TextView tv = new TextView(this);
        tv.setText("What's your name?");
        linearLayout.addView(tv,
          new LinearLayout.LayoutParams(WRAP_CONTENT, WRAP_CONTENT));

        EditText edit1 = new EditText(this);
        edit1.setText("Katou", BufferType.NORMAL);
        linearLayout.addView(edit1,
          new LinearLayout.LayoutParams(WRAP_CONTENT, WRAP_CONTENT));

        EditText edit2 = new EditText(this);
        edit2.setWidth(100);
        edit2.setText("Endou", BufferType.NORMAL);
        linearLayout.addView(edit2,
          new LinearLayout.LayoutParams(WRAP_CONTENT, WRAP_CONTENT));

        EditText edit3 = new EditText(this);
        edit3.setWidth(100);
        edit3.setText("Suzuki, Ichirou", BufferType.NORMAL);
        linearLayout.addView(edit3,
          new LinearLayout.LayoutParams(WRAP_CONTENT, WRAP_CONTENT));
    }
}
ビルド後にエミュレーター上で実行します。
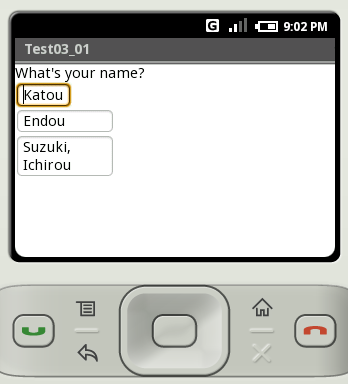
1つ目のテキストボックスでは幅を設定せずに表示文字列だけを設定しています。この時は設定した文字列が表示されるだけの大きさにテキストボックスの幅は調整されます。
2つ目と3つ目のテキストボックスでは幅と文字列の両方を指定しています。この場合、設定した幅よりも文字列が小さい場合には幅が優先され、設定した幅に収まらないだけの文字列を指定した場合に幅は変わらずに縦方向に拡大されます。
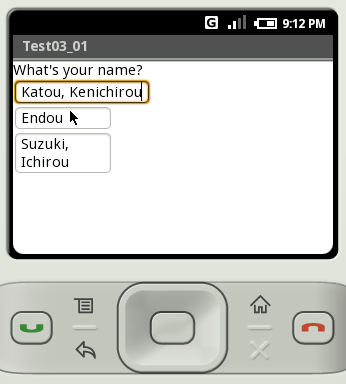
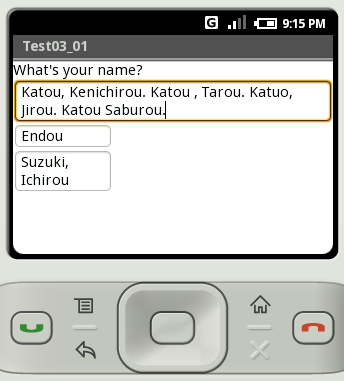
なお1つ目のテキストボックスで追加で文字を入力すると幅が自動的に拡大されます。
ただしこの場合でも画面右まで横幅が拡大された後は、今度は縦方向に拡大されます。
( Written by Tatsuo Ikura )

著者 / TATSUO IKURA
プログラミングや開発環境構築の解説サイトを運営しています。