プログラムの中でビューを定義
前のページでXMLファイルを使ってビューを定義する方法について解説しました。ここではプログラムの中でViewクラスのオブジェクトを作成しアクティビティに追加する方法について解説します。
1.アクティビティにビューを配置する
2.レイアウトパラメータ
3.テスト
アクティビティにビューを配置する
アクティビティにビューを配置するにはsetContentViewメソッドを使いますが、setContentViewメソッドは引数の違いで3種類のメソッドが定義されています。今回使用するのは次のメソッドです。
setContentView
public void setContentView (View view)
Set the activity content to an explicit view. This view is placed directly into
the activity's view hierarchy. It can itself be a complex view hierarchy. When
calling this method, the layout parameters of the specified view are ignored.
Both the width and the height of the view are set by default to MATCH_PARENT.
To use your own layout parameters, invoke setContentView(android.view.View,
android.view.ViewGroup.LayoutParams) instead.

Parameters:
  view The desired content to display.
引数にはViewクラス(又はViewクラスのサブクラス)のオブジェクトを指定します。
例えばボタンを1つだけ配置したい場合には次のように記述します。
import android.app.Activity;
import android.os.Bundle;
import android.widget.Button;

public class Sample1Activity extends Activity {
    /** Called when the activity is first created. */
    @Override
    public void onCreate(Bundle savedInstanceState) {
        super.onCreate(savedInstanceState);

        Button button = new Button(this);
        button.setText("Push");

        setContentView(button);
    }
}
ViewクラスのサブクラスであるButtonクラスのオブジェクトを作成し、setContentViewメソッドの引数に指定して実行しています。
XMLファイルを使ってビューとレイアウトを定義した時は、ビューに表示する文字列も属性として設定していました。プログラムの中で行う場合はボタンやテキストビューなどのクラスで用意されているメソッド(上記の場合はButtonクラス(の親クラスであるTextViewクラス)のsetTextメソッド)を使って設定します。
またビューグループを追加する場合も同じです。
import android.app.Activity;
import android.os.Bundle;
import android.widget.Button;
import android.widget.LinearLayout;

public class Sample1Activity extends Activity {
    /** Called when the activity is first created. */
    @Override
    public void onCreate(Bundle savedInstanceState) {
        super.onCreate(savedInstanceState);

        LinearLayout linearLayout = new LinearLayout(this);
        linearLayout.setOrientation(LinearLayout.VERTICAL);
        setContentView(linearLayout);

        Button button1 = new Button(this);
        button1.setText("OK");
        button1.setLayoutParams(new LinearLayout.LayoutParams(
            LinerLayout.LayoutParams.MATCH_PARENT,
            LinerLayout.LayoutParams.WRAP_CONTENT));
        linearLayout.addView(button1);

        Button button2 = new Button(this);
        button2.setText("Cancel");
        button2.setLayoutParams(new LinearLayout.LayoutParams(
            LinerLayout.LayoutParams.WRAP_CONTENT,
            LinerLayout.LayoutParams.WRAP_CONTENT));
        linearLayout.addView(button2);
    }
}
setContentViewメソッドの引数にViewGroupクラスのサブクラスであるLinearLayoutクラスのオブジェクトを指定してアクティビティに追加した上で、LinearLayoutに対してボタンを2つ追加しています。
ボタンには表示される文字列の他に、幅と高さに関する設定を行っているのですが、この幅と高さに関する設定はレイアウトパラメータと呼ばれるものを使って設定を行います。
レイアウトパラメータ
レイアウトパラメータはビューの幅と高さに関する設定を行うもので、XMLファイルを使っていた場合も次のように設定していました。
<?xml version="1.0" encoding="utf-8"?>
<LinearLayout xmlns:android="http://schemas.android.com/apk/res/android"
    android:layout_width="fill_parent"
    android:layout_height="fill_parent"
    android:orientation="vertical" >

    <TextView
        android:layout_width="fill_parent"
        android:layout_height="wrap_content"
        android:text="@string/hello" />

</LinearLayout>
プログラムの中でレイアウトパラメータに関する設定を行うにはViewクラスで定義されているsetLayoutParamsメソッドを使って指定します。
setLayoutParams
public void setLayoutParams (ViewGroup.LayoutParams params)
Set the layout parameters associated with this view. These supply parameters to
the parent of this view specifying how it should be arranged. There are many
subclasses of ViewGroup.LayoutParams, and these correspond to the different
subclasses of ViewGroup that are responsible for arranging their children.

Parameters:
  params The layout parameters for this view, cannot be null
引数にはViewGroup.LayoutParamsクラスのオブジェクトを指定します。詳しい説明はここでは省略しますが、ViewGroup.LayoutParamsクラスにはビューグループの種類に対応したサブクラスが用意されており、例えば次のようなものがあります。
FrameLayout.LayoutParams
GridLayout.LayoutParams
LinearLayout.LayoutParams
RadioGroup.LayoutParams
RelativeLayout.LayoutParams
TableLayout.LayoutParams
例えばビューグループとしてLinearLayoutの中に追加されるビューに対するレイアウトパラメータでは、LinearLayout.LayoutParamsクラスのオブジェクトを使います。
LinearLayout.LayoutParamsクラスなどViewGroup.LayoutParamsクラスのサブクラスは、コンストラクタで幅と高さに関する2つの値を引数に取ります。設定可能な値は次の2つがViewGroup.LayoutParamsクラス及びサブクラスで定義されています。
public static final int MATCH_PARENT
public static final int WRAP_CONTENT
※ 以前はFILL_PARENTを使っていましたが、API Level 8以降はFILL_PARENTの代わりにMATCH_PARENTを使用することが推奨されています。
MATCH_PARENTを指定すると、そのビューが追加されるビューグループの中で最大になるようにサイズが設定されます。つまり幅に対してMATCH_PARENTを指定するとビューの横幅は横幅いっぱいになるサイズに設定されます。それに対してWRAP_CONTENTを指定した場合は、ビューを表示するのに必要なサイズに設定されます。
実際には次のようにレイアウトパラメータをビューに設定します。
Button button = new Button(this);
button.setLayoutParams(new LinearLayout.LayoutParams(
  LinerLayout.LayoutParams.WRAP_CONTENT,
  LinerLayout.LayoutParams.WRAP_CONTENT));
1番目の引数に幅、2番目の引数に高さに関する値を指定してLinearLayout.LayoutParamsクラスのオブジェクトを作成し、そのオブジェクトsetLayoutParamsメソッドの引数に指定して実行しています。
※ レイアウトパラメータに関する設定を省略した場合はデフォルトの値が使用されます。
なお、ビューの定義にXMLファイルを使う場合、ビューグループに追加されるビューだけでなくルート要素であるビューグループにもレイアウトパラメータを設定していました。
<?xml version="1.0" encoding="utf-8"?>
<LinearLayout xmlns:android="http://schemas.android.com/apk/res/android"
    android:layout_width="fill_parent"
    android:layout_height="fill_parent"
    android:orientation="vertical" >

    <TextView
        android:layout_width="fill_parent"
        android:layout_height="wrap_content"
        android:text="@string/hello" />

</LinearLayout>
プログラムでビューの定義を行う場合、setContentViewメソッドで追加されているビューグループにはレイアウトパラメータが設定されていませんが、特に指定しない場合にはsetContentViewメソッドで追加されるビューには幅も高さもMATCH_PARENTが設定されるようになっています。通常ルートのビューグループにはMATCH_PARENTが設定されることが多いので明示的に指定する必要は通常ありません。
もしルートのビュー又はビューグループに対して任意のレイアウトパラメータを指定したい場合は、次のsetContentViewメソッドを使用することで指定することができます。
setContentView
public void setContentView (View view, ViewGroup.LayoutParams params)
Set the activity content to an explicit view. This view is placed directly into
the activity's view hierarchy. It can itself be a complex view hierarchy.

Parameters:
  view The desired content to display.
  params Layout parameters for the view.
2番目の引数にViewGroup.LayoutParamsクラスのオブジェクトを指定することでルート要素に対してレイアウトパラメータを設定することができます。
テスト
では実際に試してみます。次にソースコードを次にように修正します。
package jp.javadrive.sample1;

import android.app.Activity;
import android.os.Bundle;
import android.widget.Button;
import android.widget.LinearLayout;

public class Sample1Activity extends Activity {
    /** Called when the activity is first created. */
    @Override
    public void onCreate(Bundle savedInstanceState) {
        super.onCreate(savedInstanceState);

        LinearLayout linearLayout = new LinearLayout(this);
        linearLayout.setOrientation(LinearLayout.VERTICAL);
        setContentView(linearLayout);

        Button button1 = new Button(this);
        button1.setText("OK");
        button1.setLayoutParams(new LinearLayout.LayoutParams(
            LinearLayout.LayoutParams.MATCH_PARENT,
            LinearLayout.LayoutParams.WRAP_CONTENT));
        linearLayout.addView(button1);

        Button button2 = new Button(this);
        button2.setText("Cancel");
        button2.setLayoutParams(new LinearLayout.LayoutParams(
            LinearLayout.LayoutParams.WRAP_CONTENT,
            LinearLayout.LayoutParams.WRAP_CONTENT));
        linearLayout.addView(button2);
    }
}
実行すると次のように表示されます。
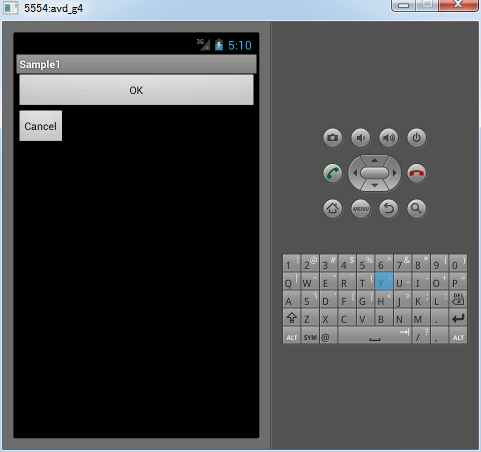
2つのボタンが表示されています。1つ目のボタンは幅にMATCH_PARENTが設定したので横幅はいっぱいまで広がっています。2つ目のボタンは幅にWRAP_CONTENTが設定されているので表示するのに必要なサイズに設定されています。
このようにプログラムの中でアクティビティに追加するビューやレイアウトに関する記述を行うことができます。便利な場合もありますが、数多くのビューを定義する場合にはプログラムが見難くなる場合もあります。
またXMLファイルで定義したビューをプログラムの中で取り出し、そのビューに対する追加の設定を行うといったことも可能です。詳しくは「ビュー毎に個別のIDを設定」で解説します。
( Written by Tatsuo Ikura )

著者 / TATSUO IKURA
プログラミングや開発環境構築の解説サイトを運営しています。